Showing posts with label cards. Show all posts

Saturday, April 23, 2011

My Sunshine….

I love my husband. He is my best friend and he brightens each and every one of my days.  He also just celebrated a birthday… which meant I needed to make him a card. 

I always struggle with masculine cards so I went with something super simple but to the point.  I gathered up some miscellaneous buttons and pulled out some my scrap paper bin and searched through the patterned paper for something fun and a little funky. I kinda had an idea rolling around in my brain and just needed to get it out of my head. 

And I like how it turned out. :)

IMG_4155web

IMG_4154web

I knew did not want to stamp on this card so I pulled out some fun little alpha stickers and trimmed them up to fit the sentiment “mat”.

IMG_4182web

When I had it mostly assembled (dry fit) I decided it needed a little something else so I threaded Bernie and did some machine stitching for a little texture.   I tore some strips of scrap paper and “stitch bunched” a ribbon onto the strip as well.

IMG_4153web

I think he liked it, too!

IMG_4170web

Inky Smiles!

Monday, May 31, 2010

Skipping Stones Design Sketch Tuesday: SSD027 Home of the Brave

Hey friends! 

I need to apologize for being away so long.  No drama, just life, and when life gets busy around my place my blog is the very last thing on my mind and very first thing to get pushed to the back of the line.  Brent took the last 5 days off of work and we’ve just been hanging out and enjoying having “nothing” to do.  We have gotten some house projects done, took care of the car and settled with insurance, bought a couple of new toys and discovered a new hobby.   I did completely space giving details on June’s Scrap My Scraps Challenge.  I will post about that tomorrow. I PROMISE :)

Moving along…


We’re starting with another month of sketches with Skipping Stones Design this week.  June’s sketch artist is Teri Anderson.  You may have seen her sketches in Papercraft’s “Go To Sketches”.

Here’s Teri’s first sketch for the month of June:

SSD027Sketch

I hope you all have had a marvelous Memorial Weekend and Memorial Day!!   I love the summer months and all the patriotic celebrations.  We have MUCH to celebrate living in America and MUCH to be grateful for. As an Army Brat I get particularly verklempt and carry a huge smile in my heart at each special holiday.   Yesterday, Memorial Day, we celebrated and honored those men and women who currently serve, have served, and have given their lives for the freedoms we treasure. In addition to many friends, both my grandfather and father served our country and I am eternally grateful for them. 

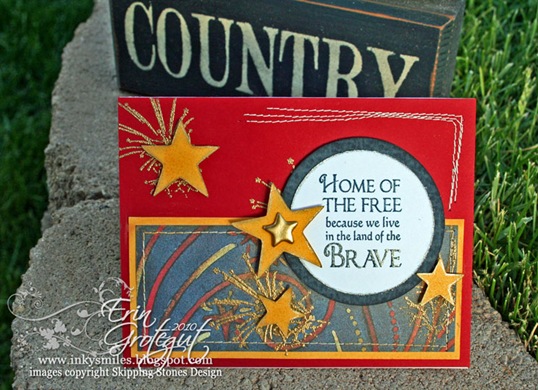
This is my card for our first sketch.  It is simple (relatively quick to create), to the point and honors those who have served.

SSD027FullWeb

I used SSD’s Home of the Brave stamp set that was released last month.   I love the fireworks and they screamed at me to use embossing powder.  Each star (cut with my new toy) is popped up with a pop dot and I blinged out the edges with a clear gel glitter pen and distressed the fronts with a chalk ink pad.  I did some random stitching at the top right corner and outlined the Provo Craft patterned paper with a straight stitch. I needed a gold brad for the center star, but only had silver so I heated it up with my heat gun and dipped it in the embossing powder.  Worked like a charm :)

IMG_8354web 
Thanks for popping by!  See you later this week!

~Inky Smiles!

Supplies:
Stamps – Skipping Stones Design Home of the Brave
Inks – CTMH, Colorbok, Versamark, Sakura Clear Glitter Pen
Papers – misc CTMH & Provo Craft (super ancient patriotic pad
Misc –CTMH gold ep, heat gun, my new toy, thread, Bernie, AC pop dots & tabs

Monday, April 5, 2010

Skipping Stones Design Sketch Tuesday: SSD019 – Whispering Wings

Happy Easter, Friends!  I hope each of you had a pleasant and blessed Easter yesterday!  Brent and I enjoyed a peaceful and quiet day together.  We listened to LDS General Conference and visited with each other.  It’s been a long week and so it was nice to just chit chat and hang out together. :)  Brent made the most DIVINE chicken for dinner… Parmesan Crusted Chicken with a Sage Butter sauce and roasted rosemary garlic potatoes on the side.. nom nom! :) I do have to admit that I am one spoiled girlie when it comes to the hubs cooking.  He’s fantastic!

This month at Skipping Stones Design we are releasing two fun sets:  Whispering Wings and Birthday Donuts!! These are both darling, darling stamp sets and I can’t wait to make some cards with Birthday Donuts!

Today is also our first April sketch.  This month’s loverly sketches come from Kimberly Crawford of “For The Love of Paper”.

Our first sketch this month is a fun one!  When I saw this sketch I thought “RUFFLES” but then  I had to figure out how to work a stamped image into it.. lol! 

SSD019web

I took the sketch quite literally this week and didn’t make any “adjustments” other than moving the sentiment.  I played around a bit with the new stamp sets that Heather is releasing this month and this is what I came up with:

SSD018Web

I stamped a dragonfly from Whispering Wings  onto white cs and colored with watercolor pencils and blended with odorless mineral spirits.  The wings (pink part) are covered in Crystal Effects and I highlighted the body and wingtips with a clear glitter Sakura gel pen.

This last week I’ve been playing around with some flowers for various projects and cut up an old pair of blue jeans.. I couldn’t resist making a flower from the denim and used the bottom hem of the legs to make a “ribbon”  The pearls are pulled off of a bit of lace… lots of “upcycling” on this card :)

I’ve been having issues with my photography skills lately and have had a doozy of a time getting the right lighting. ARgh.  ANyway… I snapped a couple of shots to show the details.  Here’s some better close ups to show the details:

SSD018SideWeb

SSD018ZoomWeb
The “sky” area round the dragonfly is pounced in ink with a sponge and the wings have gradiated coloring.

SSD018Zoom2Web

Here you can see the irridescent splotchiness on the body of the dragonfly.

Creative Bits:
Stamps:  Skipping Stones Design Whispering Wings
Inks: CTMH
Miscellaneous:  Odds n ends papers, upcycled blue jeans, pearls, Fiskars border punch and hole punch, watercolor pencils, odorless mineral spirits, misc adhesive.

Wednesday, November 5, 2008

Let It Snow

Here's a really simple little card... I was playing around with some scraps (from partial embossing the other day) while cleaning up my office this morning (I didn't get very far in cleaning). We woke up to about 2.5" of snow this morning and it's been brrr cold all day.

I used CTMH cardstock, I think it's Crystal Blue. It got mixed in with some other blues, and I haven't found my CTMH color ring (buried in boxes still somewhere) yet.

Anyway... it was partial embossed the other day for this mini tutorial and I tore some white cs for contrast. I used grey Velvet Thickers from American Crafts for the sentiment and stamped "let it" in CTMH Twilight ink and traced it with a silver Sakura Gelly Roll glitter pen. I also traced and colored in all of the raised snowflakes with the Sakura pen and finished it off with a big fat white satin ribbon. I think if I spent more time on it I could have come up with something awesome, but this was fun to just play around with and doodle and color. :) I wish you could see the glitter in person.. It's so sparkly!

Friday, October 24, 2008

Five Minute Cards


I am quickly becoming a fan of "semi homemade" cards!

My Grandma loves to send cards and so Mom and I made a zillion cards for my grandma when she was here and we needed some "quickies". I made these with DCWV's preprinted notecards... a quick stamp and a few embellishments later and we have fun five minute cards! When you're in a hurry for a hello or a thank you, this is the way to go.


Materials Used:
DCWV preprinted notecards
Stamps: For Every Occasion - CTMH
Inks: Versamark, Chocolate - CTMH
Fine Detail Embossing powder - CTMH
Threading Water border punch - Fiskars
Misc glue, ribbons, embellishments and additional papers

Tuesday, September 23, 2008

Brayer Bliss


This weekend (before the head cold/flu bug from you-know-where set in) I did a little crafting and worked on the whole "brayer issue" again.

Here's my second attempt at a card done with the brayer and sponging. I used all CTMH ink colors and played with them on scratch paper until I got the color I wanted. The blues are Indian Corn Blue, Crystal Blue, and Heavenly Blue. The greens are Sweet Leaf, Olive Green, and Garden Green. The leaves are Autumn Terracotta tipped with Goldrush.

I followed Michelle Zindorf's post and created this card but made the following changes:

I tried using markers to color the leaves and the trees and have decided that I absolutely despise CTMH markers. My browns (the new style markers) have all gone a weird greenish brown color and they cause the clear embossing powder to clump up and look blotchy. Instead, I stamped the image in Versamark, then Chocolate ink, then used my pinky finger to tap off the Choc ink on the leaves, careful to leave the Versamark so the embossing powder would stay put, and then used the corner of my Honey inkpad to tap some color onto the leaves.

I decided that I didn't like mine cut out in a circle, so I played around with my rectangle Nestabilities. The little tiny framed art looked lost on the card, so I pulled the cut out excess from the garbage bin and layered the framed part up on the "background". I like how the "wind" stamp continues off the framed part to the background. I sponged the background edges to add more depth and pulled an American Crafts satin ribbon around the card and mounted it on a kraft cardstock from Archivers.

A tip: I did notice that after I brayered ink over the embossed images that they looked kinda blah, so I used a paper towel to carefully blot and pick up the color.

Sunday, July 13, 2008

Happy Birthday Mom!!

This is way late... well late for posting, but you know how it's been at my house lately... LOL! I made this card for my Mom in May, before The Great Flood. I played around with some Papertrey Ink papers and my Nestabilities Ovals. I also did some real stitching with my old machine across the center of the card. One tip for machine stitching: try to use as little adhesive as possible where your needle will be stitching. The machine needle tends to get sticky and yucky and the thread gets globbed up and the machine doesn't stitch so nicely. Also, you will want to use a Sharps needle when stitching paper for nice, crisp holes. (I'd keep a needle set aside that is only for paper... don't use it on your fabric once you've stitched paper.)


Supplies:

Garden Green & Sweet Leaf CS - CTMH
Patterned Paper, Ribbon - Papertrey Ink
Chipboard K - Maya Road
White Glitter - Martha Stewart
Happy Birthday Stamps - CTMH
Nestabilities Dies - Spellbinders

Tuesday, June 17, 2008

Pink n Green

I can't seem to get enough of fun colors lately. Yesterday I picked up some fun stuff at Joann's to make an apron and a few items to put in my studio for the SOMEDAY that I get to decorate it again. (Too many walls to patch and stuff to repair in the meantime.)


I love this color combo! This is a belated birthday card (standard A4 size) that I made for my sister, Elizabeth.


Colors are White Daisy, Sweet Leaf & Garden Green (CTMH) and Sweet Blush (PTI) .
Supplies used are:
Cardstock - CTMH
Stamp sets - CTMH (Simple Stitches, Happy Birthday)
Patterned paper - Paper Trey Ink
Ribbon - Paper Trey Ink
Inks - CTMH & Versamark
Embossing Powder - SU!
Glitter - Doodlebug Designs
Threading Water border punch - Fiskars

Monday, April 28, 2008

Multi Fold {Flip, Flap, Fold} Card Tutorial

As promised, here's the tutorial for the Multi Fold Card I posted with the Sketch Challenge....

Adore Stacked Flower Card
(aka Flip, Flap, Fold Card)
by Erin Grotegut 2008
web: www.inkysmiles.blogspot.com


{Click on any photo to view larger}

Materials Needed:

• 2 pieces of coordinating patterned paper (I used My Mind’s Eye- Adore)
• Coordinating solid cardstock (1 dark and a couple of lights)
• Nesting circle dies (I used Quickutz) and a die cut machine (I used Cuttlebug)
• Glitter, glitter glue or other sparkly embellishments
• 1 Photo clip with brad, 4 regular brads, 1 Jumbo Brad, 11” grosgrain ribbon
• Adhesive tape, craft glue
• Crop O Dile

Instructions:
1. Cut your CS #1 4.25 x 8”
2. Score at 2.75” from the LEFT.


3. Cut CS #2 8.5 x 3”
4. Score at 4.25” (middle)


5. Adhere CS #2 to CS #1 as shown.
6. Flip the whole thing over and lay face down.


7. Cut patterned paper #1 to 3 x 4.25”
8. Cut patterned paper #2 to 2.75 x 4.25”
9. Adhere to card as shown to the left.


10. Flip back over and fold as shown to right.


11. Cut solid dark CS to 3 3/16 x2 7/8”
12. Cut solid light CS to 2 3/16x2 15/16”
13. Mount light CS on dark CS as shown to left.


14. Create a small sentiment as shown:


15. Adhere parts as shown below. Adhere the ribbon only to the front of the card. The ribbon will wrap around the back of the card and will tie at the end.


16. Layer your nesting dies upside down on red cardstock for flower.
(You can save time by arranging them as shown and running them through your diecut machine at the same time. Run through your machine and then pop out of the dies.)


17. Lightly sand the scalloped edges of the circles.

18. Use cropodile to attach large brad to smallest flower.
19. Stack up and arrange flowers. Adhere with foam adhesive for dimension.


20. Glam it up with glitter, etc, put a sentiment on the inside, and, “VOILA!” , you’re finished. I used Martha Stewart glitter glue on the brad and then sprinkled Sugar Coating glitter by Doodlebug Designs on the glue. I used Stickles to doodle around the flower petals. Be sure to let dry thoroughly.

Wednesday, January 30, 2008

Thoughts for Thursday w/ Artwork

“What do we live for; if it is not to make life less difficult for each other? ”

—Mary Ann Evans (pen name George Eliot; 1819-1880), novelist


I love this quote. I know, I say that about all the quotes I post on TFT's and throughout the blog, but it's true... quotes and thoughts are not going to make it here unless I really like them :) I read this quote the other day and thought, "gee, that's so true... or at least it should be". Am I guilty of not helping someone along the way? Am I looking out for me and only me? I really don't want to answer yes to either of these questions.

Today I was thinking of things that I can do to make life easier for my sweet husband. (I'm home now mostly full time. I still work PT outside of the home and run our business from the house, and am still adjusting to this role.) A couple of the things I thought of is to have dinner ready when he comes home from work (or at least on it's way) and things basically picked up an
d kept tidy at home so that he doesn't have to worry about these things after a long day at the office. He works hard and shouldn't be burdened with tons of extras at home. (Goodness knows, I have a pretty nice "honey do" list anyway, lol!) I know that may sound silly, retro, or 50's mentality to some, but I think it's just a couple small things I can do to lessen the load of someone I love.

What is something YOU can do to lessen the load of someone else? I would love to hear!

Inky Smiles!

Erin


{Artwork}
I made a slew of these nifty little 3x3 "cards" for a Valentine's book that I m making with some girls in a swap. They were super fun and super easy to do.

Papers are CTMH, Stamps are CTMH, Ribbon is American Crafts, Brads are probably CTMH (they are all mixed together so who knows!)

I used the Quickutz Nesting dies to cut the scalloped circle and then ran it back through to emboss a circle around the inner edge. This was my first sample.. I replaced the scalloped circle on it once I had it just right. :)

Inky Smiles!


Tuesday, January 15, 2008

Elegant Floral Card - for Sketch Challenge {008}


Simple, yet elegant card based on the sketch {008} . It's sharp and clean and screams feminine to me.

Techniques - 2 step stamping/2nd Generation stamping, cuttlebug embossing.
Stamps: Elegant Floral-CTMH, For Every Occasion - CTMH
Inks: CTMH
Other: Cuttlebug Textile folder, Stickles-icicle

This card is a simple and fast card. Once I had the colors picked out the whole thing took maybe 10-15 minutes in production, well, plus a little dry time for the Stickles.

Thursday, December 13, 2007

Thoughts for Thursday - Merry & Bright

Last night, as I was laying in bed after a LOOOOOOOONG day of work (I have to go back today to finish up some accounting) and a super long evening of Christmas shopping with my sweetheart, I was thinking, "What on earth am I going to talk about for a TFT tomorrow???" Then this am I woke up and checked my email and the Foundation for a Better Life (FBL) saved my tired bum again! YAY! This cool little quote was waiting for my in my inbox and it's perfect for a piece of art I've been working on and can't wait to show you all!

“ Trust that still, small voice that says,
'This might work and I'll try it.' ”

- Diane Mariechild, author, speaker

Sometimes I think that we doubt that little creative voice within us. Initially we have this GREAT idea... but then we think, "nah... no way.. I can't do that" or " it's not gonna work" and we don't keep trudging through the creative process. I know that quite often I get frustrated and annoyed if something isn't working how I think it should and just pack it up and quit working on the idea. This time I kept on trudging.... and although I didn't reinvent the wheel or anything like that, I'm excited about it, another fun and out of my box project. I used some elements of a really fun Bind It All project that I will show you later this week.


I think I mentioned previously that I have discovered Perfect Pearls and I am very much in loooove with them! I made this card for a friend last night. I wanted something merry and bright and cheery. I think I accomplished merry and bright.. Tee hee!

Perfect Pearls are sooo awesome! You can mix them with a tiny bit of water and use as a "water paint" (which I did over the Liquid Glass on the r, i, h, t) or brush on to wet ink (which I did on the MERRY) and then spritz with a tiny bit of water which will "set" the pearls. I also "water painted" the edges of the Honey (CTMH) card stock that the BRIGHT letters are mounted on. I love how the Perfect Pearls transform the card stock to a metallic card stock.

I strung plastic and glass beads (CTMH - red, white, green; generic - yellow) and 32 gauge gold wire and "hung" the strands from a brad.

Supplies:
Cardstocks, Inks, Liquid Glass, Beads - CTMH
Delightful Alphabet & Rustic Alphabet Stamp sets - CTMH
ATG adhesive - Scotch 3M
Perfect Pearls - Ranger Ink
Glass micro beads & glass beads - misc. vendors.
Scalloped scissors and hole punch - Fiskars
Handwritten Font - Yours truly

Thursday, November 1, 2007

Belated Thoughts for Thursday, Perfect Pearls, Cuttle Bug


“ Only the curious will learn and only the resolute overcome the obstacles to learning. The quest quotient has always excited me more than the intelligence quotient. ”

- Eugene S. Wilson (1900–1981)
Dean of Admissions at Amherst College

I love this quote! There is something special about the journey when trying something new. Tonight I went on my own "quest" and learned something new... sorta. I PLAYED with something new!!!! So I am a Technique Junkie and I am always oogling over their techniques and have had fun playing with the ideas.


Tonight I made my own version of the "Cuttle Bug Smoosh" and played around with Perfect Pearls. I painted PP powder into the recessed side of the Cuttle Bug embossing folder and ran the kraft colored paper through the CB . I also stamped the Bethlehem and sentiments with Perfect Medium and dusted with the PP powders. I spritzed the paper flower with a mixture of Cranberry reinker and water and rubbing alcohol and let it dry. I brushed some PP on the petals while they were still wet. I am diggin how the PP look when you wet the powder. Then I loaded up some gold glass beads on some Liquid Glass. O Holy Night is embossed on a chocolatey brown paper.

The card still needs something, but I am not quite sure... it feels unfinished to me. Not mentioning that it's just a card front at this point.. but the design needs something... any ideas?

Glass beads - Halcraft
Papers - Archiver's
Perfect Pearls - Ranger
Perfect Medium - Ranger
Inks - CTMH
Embossing Powder - CTMH
Paper flower - CTMH
Organdy Ribbon - CTMH
Cuttle Bug machine
Cuttle Bug Textile Embossing Folder
ATG Gun & Adhesive


Wednesday, September 5, 2007

Happy Birthday Sadie!

Today is the birthday of my beloved furrbaby, Sadie. No, I am not the crazy dog lady... well, ok, maybe I might be .... just a little bit. I made this little card in honor of her bday. I used American Crafts paper, CTMH chalks & inks, and the stamp is from Stampin' Up.

We were feeling baby hungry a few years back, 6 ago this Nov 5th to be precise, and took a little window shopping trip to the animal shelter.... JUST TO LOOK... (ok so B and I have decided we are not allowed to "just look" anymore... that's how we ended up with a house, the Tahoe, and Sadie). Anyway, we wandered through the animal shelter and looked at all the available furry friends. I was bawling when I walked around the last corner and saw this little tiny animal carrier perched up on a file cabinet... peering from behind the bars of the door were two eyes of the strangest color yellow/amber. A few seconds later we were greeted by a string of yips and barks. I had found my baby!!! Immediately I knew she was the one for me (us). LUCK of LUCK, she had just come off of quarantine that day. The animal shelter people guessed that she was approximately 2 months old and had her birth day listed as Sept 2, 2001. We paid the adoption fees, scooped her up, headed into WalMart to pick up some doggie supplies and thus began our life with a dog.

Sadie has been the best little blessing in our life for the past 6 years. She's been happy company and loves unconditionally. She's smart, well behaved, and spoiled rotten (uh, I mean well loved). She's super friendly and has helped so many children overcome their fear of dogs. I am glad that we have her in our life.

Yes, I am the crazy dog lady.... I plan on making cupcakes this Sunday and having some friends of ours over for a birthday celebration.. tee hee....