Monday, January 31, 2011

Paninis – PuertoCuban style! (or Almosta Cubans)… An International Culinary Adventure… or something…

So I may be buried under piles of paper and jewelry supplies but occasionally I pull myself out of the mess and make dinner for the Brent-man and myself.

My friend, Jamie, has been sharing recipes and pictures of her new “skinny” meals and one of them caught my eye and whet my appetite :)  It’s called “Cuban Sandwich Quesadilla” and is made with Pernil, a slow cooked pork, pickles, ham, swiss cheese and mustard.   Now, I’m not a fan of mustard but I like everything else on the sammie so I figured we’d try it out.

cuban-quesadilla
Here’s what you need for a traditional Cuban:

Pernil (skinny variety from skinnytaste.com)
Some type of bread (we used Naan)
Dill Pickles
Mustard
Deli sliced ham
Swiss cheese (or other easy melting white cheese)

On Saturday Brent and I spent the afternoon shopping up in the “big city” and hit WinCo and Sunflower Market… our two new fave stores.  We picked up some yummy organic veggies at Sunflower and made our own peanut butter at WinCo. We were like small children at the peanut butter station.  LOL! It’s actually very cool to watch and it tastes DIVINE.. nothing but peanuts… no additives or extra “fluff”.

So after we unloaded all our goodies we pulled out the pork roasts (they were small 1 lb roasts) and threw a couple in a glass bowl, mixed up the marinade and let it sit over night.  We turned it a few times that evening and then into the crock pot it went Sunday morning.  Our house smelled absolutely DIVINE and thankfully since the roasts were smaller we didn’t have to let it cook the full 8 hours. I think we made it 6 before our stomachs demanded to be fed. LOL!

We pulled the pork out, barely let it cool, and shredded it with forks.  We probably could have just used the tongs because that pork just fell apart if you looked at it hard.

IMG_3099web

I took a little “culinary license” when creating our sandwiches… 1) we were out of mustard and 2) I forgot to buy ham, but that’s ok with me.   On my sammie I subbed provolone cheese for the swiss because I don’t handle swiss cheese very well.  SO much for authentic, eh?  So these are “almosta Cubans”…. they were delicioso anyway!  I am all about KEEPING IT REAL here on my blog.  You may see fru fru art, but the rest of it is all me, all real… the good, the bad, the ugly, and an occasional panini.

IMG_3100web

IMG_3097web

The bread that we used is called Naan.  It’s an Indian flat bread and I am sure it can’t be that difficult to make… I’ve been reading about it today and we’re going to try it out sometime in the near future.  Yeah, so I think I have REALLY messed this recipe up.. they’re PeurtoIndaCuban Paninis now… and Panini is an Italian word.. well heck.. it’s an international culinary adventure.  And we made them again tonight with Dijon mustard… great, now the French are involved… what has this kitchen come to?

But alas, we continue…

So I don’t have a traditional “panini maker” but I was able to create the same effect with a few everyday kitchen gadgets that are common in most kitchens.  Brent has this FABULOUS cast iron griddle that can be used across two burners on our gas stove, so I flipped it over to the “grill” side of the griddle and laid out the sammies, then I folded them over and let them heat up.

To “press” the sammies and get the “panini effect” I used a metal cookie sheet and Brent’s new BSA 100 anniversary cast iron skillet (Lodge).  See.. Keeping it REAL… always open for an opportunity for creative cooking :P

 IMG_3101web

Look at those yummy little treats getting all nice and squooshed and heated through!  LOVE IT! LOVE IT! NOM, Nom, nom, nom…. noooomm…

IMG_3105web

IMG_3107web

So we let them sqooosh there for a while.. I didn’t track the time… I flipped them over once and grilled the other side . When they looked all nice and toasty and crunchy on the second side I slid them off onto a plate and sliced each one in half.  I served them up with grapes and marinated cucumbers and onions.  Delicioso!

IMG_3112web

Now go out and make your family something adventurous!

Inky Smiles!


PS.. we made them again tonight… so good.

Monday, January 24, 2011

Gearing Up For Creative University

Gosh I’ve been busy behind the scenes here lately getting ready for Creative University and a visit from my aunt and cousin from Massachusetts who are going to be here when I return from C.U. and stay with us as they travel cross country to LA.  Crazy stuff!  We DID finally get Christmas down and put away and even de-junked the Christmas/Seasonal Decor closet (aka under the stairs). Yahoo! 

I’ve also been working on 60 charms (20 art charms, 20 fillers and 20 extras for swapping on my own) for the Charm Swap that I am in and in charge of and working on the jewelry class that I am teaching.  I’m prepping my supplies, packaging them up and planning the agenda for my class (so I can keep on track, haha!)  I really wish I could share photos with you of what I am working on, but it’s supposed to be a secret so I can’t share just yet…

However, I do have some photos of the roomie gifts that I did last year and don’t think I ever shared these with you so I’m going to share them now. :)

I wanted everything to kind of have a little “theme” so I found some fun goodies in the CU “colors” and put these together.  They were very affordable and easy to make. Everything except the mini nail polish (Sally) and the treats  (Wmart Valentine’s aisle)came from the Michael’s dollar aisle.  I wanted to be able to do 5 sets of gifts at a reasonable price and still have some fun.  Presentation is the key to sprucing up dollar items.

Here’s the package all done up.  I bought the bags at Michaels ($1) and created some digi art in Photoshop for the front of the bags.  I also cut and punched out some cute lacey borders and adhered them to the main “label” and then to the bag.  I looooove the lacey lingerie background.. fun and whimsical.

IMG_7018web

 IMG_7021web

Here’s a snapshot of the “loot” laid out.   The notebooks were $1 and I added some altered chipboard (covered with BG paper) and some Maya Road flourishes that I glittered to death and adhered to the front of the notebook.  The pencils came in a pack of 12 for $1… I split them up and made little tiny label size wraps that I stamped with a CTMH stamp “Special Delivery”.   The mini pedicure kit was also $1 and I tied a little stamped shoe tag (also glittered) to it with a ribbon.  The nail polish was less than 99c at Sally, I think I got it on sale and the sleep masks were also less than $1.  The princess door hanger came in a pack of 4 for $1 and I pulled out the pink and green ones and glammed them up with glitter and put a cute little sentiment on it.  The treats came in multi packs from Walmart’s  Valentine’s treats aisle.

IMG_7023web

IMG_7031web

 IMG_7028web

IMG_7032web

IMG_7027web

IMG_7030web

Whether you’re headed to CU, a different retreat, or just need some fun little giftie ideas, I hope this inspires you.  This year I am doing something completely different and without quite so many goodies, but it will still be fun!  Can’t wait to share the pics with you later!

Inky Smiles!

Monday, January 10, 2011

National Clean Off Your Desk Day

This is the current state of my desk…

Picture 78

{Pardon the picture quality.. I snapped it with my webcam because I am too lazy to haul upstairs and charge the battery for my camera.}  It could be worse… oh wait, it IS worse.. you don’t see the stuff upstairs on my table that has to come down here to the desk to find new homes. LOL!

Today is National Clean Off Your Desk Day… I read it somewhere online so it must be true! :) How perfect!  I guess you know what I will be doing today, tomorrow, and the next day.  Sorting out this desk and all the goodies that are upstairs on the table.  I won’t even mention that all of my Christmas decor is still up and on display.  That happens when you go away for Christmas and come home to a funeral, work, and then get a nasty humdinger of a cold. Christmas can wait.  The desk, however, can not.  I have projects to create and work to do!  Creative University is just 6 weeks away and I have lots to get done and finished up!

I’ll get to working on this mess and get back to the blog soon! 

In the meantime… show me your messy desk! Leave a comment with the link so I won’t feel so bad.

Inky Smiles!

Thursday, December 23, 2010

Merry Christmas!!

Wishing you and your family the MERRIEST of Christmases and a BLESSED New Year!  This is our Christmas card this year… I created it in Photoshop Elements and printed it on 1/3 sheets front and back on glossy cardstock.  This is the digi version showing both sides.

ChristmasCardforWeb

And a little disco funk for your Christmas pleasure featuring the three of us crazies… sure wish I could really move like that!

Merry Christmas!!!

Love,

Erin, Brent & Sadie the pooch

Sunday, December 19, 2010

Chinese Crystal Jewelry Set

I know it’s been a while since I promised to show you the necklace I made at my jewelry class earlier this month.  This month sure has gotten away from me as I am sure it has for most of us.  Today we got the last of our Christmas gifts wrapped and under the tree and tackled some household chores before Christmas arrives including Mt Grotegut, the ever growing mountain of laundry.  We’ve been somewhat “lax” on it this past week with all the Christmas festivities and preparations… anyway… it’s nearly done… for now… haha.
So I have had so much fun wearing this jewelry set.  I’ve worn it nearly every chance I get.  It matches EVERYTHING, almost literally, with all the fun colors in it. It’s been particularly festive to wear to various Christmas parties and gatherings.

I purchased these strands of mixed crystals at a gem fair that came through here this summer for a ridiculously low price and can’t wait to see if the gem show folks bring more back this spring. I just love these beads!

Here’s the necklace.  It’s made with silver plated 26 gauge wire and closes with a silver plated toggle clasp.

IMG_2144web
A closer view of the strands.

IMG_2154web

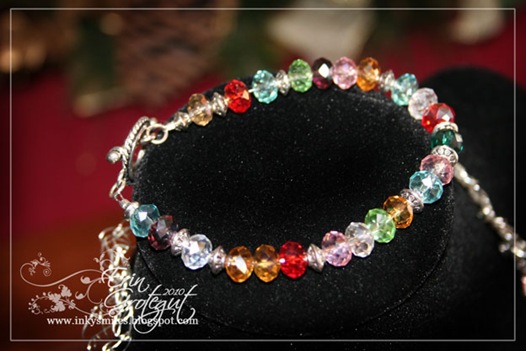
I did a very simple strung beads bracelet to go with it. Actually, I made this bracelet about a month prior to making the necklace.  I was anxious to make a necklace to go with it but got busy doing other things again.  The bracelet is strung on tiger wire and closes with a silver plated toggle clasp.
 IMG_2151web
I am most excited about this piece… a handmade ring..  I used 14 gauge silver plated wire with a mandrel to create this 4 wire wrapped ring (say that 4 times fast). I “sewed” the beads on with silver plated wire and secured with “knots”.  I LOVE this ring.  it is fun to wear and catches the light nicely… I love when it catches the sunlight when I’m driving and I am surrounded by hundreds of sparkly dots reflecting on the car surfaces.  It’s magical!

IMG_2159web
IMG_2165web
IMG_2166web 
{Pardon my wrinkly grandma hands.  I’ve always had
wrinkly hands…I attribute it to using them a lot. HAHA!}


I’ve had so much fun making jewelry lately and have scheduled a couple more classes for January outside of my home.  Want a class?  Just ask me and I’ll send you the details.

Thanks for stopping by today! Leave me a comment and let me know what you find most challenging about jewelry making… I'm dreaming up some technique posts...

Have a marvelous week!
Inky Smiles!

Wednesday, December 15, 2010

Denise Macias Please Contact Me

Update:  Denise has claimed her prize!  Merry Christmas, Denise!

Denise Macias -
Please contact me via email by 8 pm (mountain time)on Thursday, December 16th. regarding the prize you won here on the blog.  Because this is a time sensitive prize I will draw a new winner on Friday morning if this prize goes unclaimed.

Inky Smiles!

Sunday, December 12, 2010

O Christmas Tree

Hi all!

We’re busy working on Christmas presents and Christmas goodies (aka TREATS) and enjoying this Christmas season.  I’ve wanted to share pics of my Christmas ornaments for a while now so I’m linking up to two parties:  Thrifty Decor Chick’s Tree Party and Flamingo Toes’ Ornament Party with today’s post.  I am excited to share with you my tree and some of my favorite ornaments.  {There are tons and tons of ornaments on my tree, but I’ll only share some of them.}

                                          Holiday_Home_Button_Sarah[3]   Ornament-Party

Here’s our 7.5’ Christmas tree.  I think this year is our 11th Christmas tree with it. The branches are falling apart slowly and it’s not pre lit.  Every Each year we say we should get a new tree, but we end up either buying new lights or fixing the branches… hehe…   Brent strings those 1400 lights on by hand every year… the set up & light process takes about 3+ hours.   When we decorate the tree we put on our favorite Christmas music (Bing, MoTab Choir, etc) and decorate it together.  I love decorating the tree with Brent. It’s so much fun and makes my heart sing.  Our tree does have some “matchy” ornaments and is mostly red, white, and gold, but is overall a “memory” tree filled with ornaments that mean something to us and have special memories attached.

IMG_2027web

The tree is 7.5' tall but it was hard to fit presents under the tree, so Brent built a stand which helps our little tree be nearly 8.5’… much cheaper than buying a new tree!  And the skirt drapes nicely over it…  Speaking of the skirt, we shopped all over one year looking for the perfect skirt to fit our tree and decor of our home.  Ultimately we landed at WalMart… $34 later we found the perfect skirt. {The only one like it and we’ve never seen one like it there again.}

IMG_2009web

Each year we get a few new ornaments for the tree.  This year I added some sparkly leaf branches to poke in the tree and some mercury glass pine cones.  {You can see the pokey sparkly branches in the tree.} I just love how much sparkle these add. I bought six but wish I had bought more!

IMG_2353web

Every time we go somewhere new for a “vacation” or “mini vacation” we buy an ornament if we can find one.  This year we went up to see the Golden Spike National Monument {on a mini vacation/road trip/date} and picked up this ornament.  We didn’t really go anywhere else “new” this year…

IMG_2354web

Last year we went to Massachusetts for my Grandpa’s 80th birthday and loved all the covered bridges in New England so we picked this one up at a gift shop that WAS a covered bridge. 

IMG_2293w

When we first bought our tree we needed some BIG ornaments {aka normal ornaments} because I had only had a little 3’ tree in college and before we were married} and we found these glass beauties at ShopKo.    I love that they have the “nativity scene” on them.  We also have not ever found more of these in gold since.

IMG_2295w

Last year my sister’s kids made homemade ceramic ornaments and sent them to us for our Christmas present.  We have three, one from each kid, hanging on our tree.  {A star, a tree, and a stocking.} I love them…

IMG_2268w

We picked this fortune cookie up on the east coast.  I put it on the tree to “bring good fortune”.

IMG_2263w

Our ornament from when we attended some events at the 2002 Olympics in Salt Lake City.  We went to some skiing events {ski jump and cross country} and a medal awards ceremony.

IMG_2271w

This ribbon candy ornament reminds Brent of his grandma.  She always had those hard ribbon candies in jars at Christmas.  Brent always laughs about how they all think that the candy was the same candy from year to year {meaning it was never eaten, but always there}.  I think my Great Grandma did the same, lol!

IMG_2262w

This is one of my favorite ornaments… our first Christmas together.  My mom bought it for us.   {The shell in the background is from a fun trip I took to San Diego in college.}

IMG_2274w

I just LOVE this ornament.  I made it in the 3rd grade at school.  It is made from a plastic cup {the kind you usually get at wedding receptions and parties}, sharpie markers, and cheap plastic beads.  We colored on the inside of the cup with the markers, tossed the beads in and then put the cups on a baking sheet in the oven.   I was really excited when mine came out looking like a butterfly.  I have cherished this ornament.

IMG_2279w

This lovely glass ornament was Brent’s Great Grandma Stewart’s.  He said that she always had a white flocked tree and lots of blue ornaments on it.  We have a photo of the tree that we keep in the box with the ornaments.  We only have two and I noticed this year that one was cracked.  It nearly broke my heart.

IMG_2285w

This ornament is a new one for this year.  Sorry for the lousy pic.  I’m too lazy to go back upstairs and retake and edit pics. :P   This ornament has a lovely nativity scene on it.  {Did I mention that I am collecting nativities?}  Oh and hey… there’s some of those sparkly pokey leaf branch thingie.

IMG_2361web

This nutcracker ornament is one of about 36 on the tree and reminds me of the many (9)Christmases that I spent in Germany.

IMG_2357web

This ornament has a couple of memories associated with it.  It is one that I made when I was about 7 years old in Primary at church.  The silly picture is me at a church Halloween party. I wore my mom’s “nightgown” {uhm, lingerie jacket thingie} and went as a gypsy. LOL!  I wonder if she even thought about what I was wearing in public. Tee hee!  The backside of it is a felt Christmas tree.  I remember making this and trying so hard to get that gold ribbon perfectly round and to stick flat with that awful Elmer’s glue. I guess I knew even way back then that Elmer’s glue was not my favorite craft glue.  LOL!

IMG_2288w
IMG_2290w

I love these pointsettia flowers.  Brent’s mom made them out of wired, beaded ribbon and used some little red berries for centers.  I LOVE these and they are great for filling in holes in the tree.

IMG_2261w

Here’s a corner shot of the room.  I love my cozy little Christmas.  I wish we had a fireplace to hang stockings from, but they hang perfectly right now on the shelf that Brent built for me for Christmas a couple of years ago. The antique buffet was Brent’s Grandma Grotegut’s and is a treasure to us.

IMG_2330w

Thanks for stopping by! Hope you enjoyed reading about my fav Christmas ornaments!

Inky Smiles & Merry Christmas!

Friday, December 10, 2010

Picaboo Book Winner

Ahhh.. running behind tonight, but alas, here we go.  I used Random.org to draw a winner for the Picaboo Photo Book giveaway….

Drum roll please….. tappity tap tap tap thumpity thump thwamp……

PicabooWinner

Counting down the comment list….

#6 is Denise Macias

Congratulations Denise!  Please email me your email information so I can have Picaboo send you the info for your photobook!

Inky Smiles!


PS… Kathy S- I looked into where Picaboo ships and YES, Australia IS on their list!

Thursday, December 9, 2010

Simple Christmas: Brownie Box Slipcover - Tutorial

Hello!  This morning I had an email from a friend asking me if I had seen a particular template she had been looking for “a slipcovered brownie mix” or something like that… I did a little searching and found nothing but I remembered that some mixes we bought from Lehi Roller Mills last year had “slipcovers” on them.  So this morning I set out to create my own template.  This is a simple tutorial. I shot from the hip and just snapped photos as I went (on top of the mess I’m currently working on) which explains the messy photos.

Here’s what I came up with.  Lou Faye, I hope this helps!

Slip Covered Brownie Box Gift

This slipcover was measured to fit a Betty Crocker Brownie mix.  I am sure it will work for other similar size cake and cookie mixes.  If not, it is VERY EASY to alter this slipcover… just adjust the score lines.

What you will need:

Your brownie mix box
A scoring tool (I’m using my ScorePal)
Cardstock
Adhesive
Paper Trimmer
Decorative Paper, Stamps, Stickers, Ribbons, Embellishments, etc, to decorate your box

Step 1

Cut two pieces of cardstock to 8”x7 5/8”.  Mark the 8” side with a pencil (a little tick or x will do) so you know which side it is.   Turn the cardstock so that the 8” side runs horizontally.

IMG_2193web

Step 2

Measure from the left side of the page, not the score lines.  Starting from your left, score at 3/4” and then again at 6 1/2”.    Repeat on second piece of cardstock.   You may fold your cardstock now or wait until later. {I fold mine now and check the fit by wrapping the pieces around the box.} 

Tip: Did you know that when you fold a scored paper that the valley you created by pressing down and scoring should be on the OUTSIDE of the fold? This is because you have already “stretched out” the paper.  Folding it on the inside of the fold can cause the fold line (on the outside) to tear and look yucky. 

IMG_2186web


Step 3

At this step I start to decorate my slip cover.  Determine which piece will be your “front” and position it so that the folded edges face AWAY from you.  (I had to cut a new piece for this shot because I dropped my stamp on my paper… keepin’ it real here, keepin’ it real!)

Decorate your front how you’d like.  Here I have stamped a Christmas sentiment from the CTMH stamp set, D1440 “Everlasting Life” in CTMH Cranberry Ink. And then I decided it needed a little bling so I pulled out my Sakura Star Dust glitter pen and highlighted the flourished words with it.

IMG_2196web

IMG_2198web

IMG_2199web
Step 4

Lay out your cover pieces like this..

IMG_2200web

Apply adhesive to the FRONT side of the 3/4” side of the front piece. (clear as mud?)

IMG_2204web 

IMG_2207web

Steps 5 & 6

Step 5 -Join your pieces like this by laying the wide piece of the back cover over the 3/4” piece of the front cover.  I forgot to take a pic of it so you’re seeing the next “step”.

Step 6 – Apply adhesive to the FRONT of the 3/4” piece of the BACK cover. (clear as mud again? LOL!)

Dang, those brownies are making me hungry….

IMG_2208web 

Realize you’ve run out of adhesive when your tape snaps off 1'” from the top of the cardstock… pull out your super sticky red tape cuz you’re too lazy to change the ATG tape and finish applying adhesive.  {Told you, keepin’ it real here!}

IMG_2209web

Step 7

Fold the box so that the wide piece of the FRONT attaches to the 3/4” piece of the BACK.  Press to adhere.

IMG_2210web

Step 8

With both hands, begin sliding the slipcover over the box.  My slipcover fit very snugly on the box and took both hands to gently work the cover down the box. I might increase the score lines by about 1/16” inch next time.

IMG_2211web

 IMG_2216web

Step 9

Now it’s time to embellish a little.  Look to your left at your mess of ribbons {which you took out of your RibbonStack and put in a giant basket to tote with you somewhere and never made it back in your RibbonStack} and pull out something festive. I decided to go simple and just tie a ribbon around the box.

IMG_2217web

 IMG_2221web 
Not bad, but it could use a little more bling… Let’s try adding a fabric strip and some fru fru glitter foliage.   MUCH BETTER!

IMG_2224web

IMG_2225web

Or print a cute little tag like this on some cardstock and layer it up on the front of the box.  You can download a full sheet of labels HERE.  Please note these are for PERSONAL use only. Do not redistribute.

MakeYourOwnDangTreat

There’s all kinds of ways you could dress up your slipcover!  Tie a spoon or whisk to the ribbon and put it all in a bowl, tie on some berries or twigs for an earthy look, or attach a handmade ornament.  The possibilities are endless!  Let me know if you create a slipcover box! I would love to see what you come up with!

Inky Smiles!